Momtastrophe or Momtastic

Thursday, December 29, 2011

A Spoonful (or 12) of Sugar

I asked Ellen Miller of Isobreathing to give us the scoop on how food and drinks we consider healthy can be deceiving.

Read your labels!


The new year is upon us and many of us make our yearly resolutions to become healthier and lose weight. I was asked to write this article as an eye opener for many. Yes we have been told to read our labels but how many of you are actually doing this. While there are many components to reading labels I am going to focus on sugar for this article. I hope that the references below will help you be more aware before you purchase foods especially if you are feeding young children.


When reading labels do you know what ingredients are actually sugar?


Look for: malt, sorghum, sucrose, fructose, maltose, glucose, dextrose, high fructose corn syrup, maple, brown sugar, powered sugar, brown rice syrup, cane juice.


or sugar alcohols: mannitol, sorbitol, xylitol


Look there's sugar in my yogurt: A great article on how much sugar is in yogurt. We typically think of yogurt as a healthy option. The photo above shows 8 teaspoons!


Remember every 4 grams is equal to 1 teaspoon.


More Sugar Shockers:

Apple cider 81 grams (20 teaspoons),

Instant coffee with sugar cappuccino flavored 64 grams (16 teaspoons),

Fruit punch powdered mix 95 grams ( 23 teaspoons)

Sweet tea 95 grams,

Grape juice frozen concentrate sweetened 36 grams

Salad dressing for coleslaw reduced fat 38.4 grams

Canned fruit 77 grams

Dried cranberries sweetened 62.6 grams,

Carmel popcorn 64 grams,

Banana chips 25.7 grams

Granola bars oats fruits and nut 40 grams


Upon checking WebMD I found:

SoBe Energy or Elixir: 16 ounces = 52-54 grams sugar, 200-220 calories

SoBe Green Tea: 16 ounces = 50 grams sugar, 200 calories

Snapple Iced Tea, Peach, Lemon, or Raspberry: 16 ounces = 46-50 grams sugar, 200 calories

Arizona Iced Tea: 16 ounces = 48 grams sugar, 180 calories

Snapple Antioxidant Water, Agave Melon: 20 ounce bottle = 32 grams sugar, 140 calories

Glaceau Vitamin Water: 20 ounce bottle = 32 grams sugar, 125 calories

Gatorade Bring It, Shine On, or Be Tough: 16 ounces = 28 grams sugar, 100 calories

Instant Cocoa: You’d probably expect hot cocoa mix to have cocoa, or maybe powdered milk, highest on its list of ingredients. But for Swiss Miss Mocha Cappuccino and Marshmallow flavors, the first and second ingredients are sugar and corn syrup, with cocoa listed as the fourth ingredient.


Swiss Miss Mocha Cappuccino or Marshmallow flavors: 1 envelope made with 6 ounces water = 19 grams sugar, 120 calories


What can you do?

Read your labels, keep an eye out for the sneaky sugars and choose products without added sugar.

Make your own, to enjoy yogurt without the added sugar, make your own flavored yogurt starting with Greek Yogurt (it has 4.5g sugar per half cup and it is not from added sugars, but the sugar found naturally in the milk) and add in fruit.

Drink more Water, Hydration is very important in overall health and wellness add in a slice of lemon or lime to give your water flavor and save yourself the calories of the drinks listed above.

Friday, December 16, 2011

Decoding your DSLR Camera

One of my New Year Resolutions is to figure out how to use more than just the auto setting on my DSLR. I turned to my good friend and fellow April Mommy Cassie Sperling of Studio None Photography, located in San Diego, CA for help. (She is also famous and was recently on the Dr. Oz show which is super cool)


Guest Blogger Cassie Sperling:
So, you have this really cool DSLR camera, but you don't know how to use it outside of the auto mode. You find yourself playing around with it, but then realize, you can't take a photo in the dark. "I paid all this money for a nice camera and it won't take a picture in the dark..." That was me not too long ago. I purchased my first DSLR in 2008 and have taught myself, without any courses, how to take better photos.

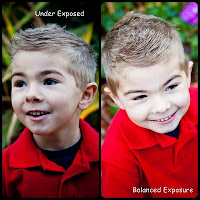
Exposure is your best friend in the photography world. Literally, just like your best friend, you find the exposure is sometimes way too bright for your liking, or too dark. Like your friendships, there needs to be a balance. Looking through your viewfinder (through the eye piece), you will see a meter on the bottom that lights up. Your goal here is to place the bar in the center of the meter to capture the best exposed photo. You can get creative with this feature if you want to purposefully over or under expose a photo.


"How do I get that bar to move?" you ask. There are a couple of ways to move that bar. ISO speed, shutter speed, and your f stop (or aperture), will help you create the perfect photo. Low light situations call for a higher ISO speed. The higher your ISO, the more light is let into your lens. Remember what I said about balance? High ISO speeds produce a lot of noise in your photos (the grainy pixels), so make adjustments with your f stop and shutter speed to create a nice balance. If you have editing software, such as Adobe Lightroom, you can reduce the noise in your photos and won't have to worry as much about a higher ISO speed. If you do not have editing software, play around with your settings, get them on the computer ASAP so you can get instant feedback and make adjustments in the future.


Your shutter speed works in the opposite direction as compared to the ISO. The higher the fraction on your shutter speed, the faster the shutter opens and closes, and the less light is allowed in through the lens. Sharp photos are produced with a faster shutter speed to reduce camera shake and to increase image stability. In combination with the ISO, your exposure is almost set.


You are in love with the photos that focus in on a subject, but are nice and blurry in the background, but how do you take that photo? (note from Mrs. Alexandria, I have always wondered this I am so excited to finally have the answer) The f stop, or aperture, determines the blur of the background, as well as how much light can be let into the lens. A low number for your f stop, such as 4.0, allows the lens to bring in more light to the camera. I always start out setting up the f stop to produce the image I am trying to capture, then I adjust the ISO speed and shutter speed.


Now that you are balanced, what are we missing? Our subject! The most important aspect of your photo. Kids are the perfect subject to test out your photography skills. With their fast action, they keep you on your toes, and will keep you adjusting your settings on your DSLR.


I have found, if you want a child to cooperate with you to get the perfect shot, start out by getting down on their level. Less intimidation is key...well, that and bribes too. Play with the angles as you capture your images; at the same time, interact with the kid. Sometimes it is hard to forget they are just sitting there building up large amounts of energy. Try some photos from up high, down low, to the side, from behind, or even straight on. Practice will make you a better photographer and it will also help you develop your own style. Remember, the more photos you take, the more you can learn about your camera, its settings, and your own style. Go grab your DSLR and start playing!


Be sure to follow Cassie on Facebook or send her an email if you have any questions studiononephotography@gmail.com

Thursday, December 15, 2011

Free Dog Treats!

In honor of my best furry friend Remy turning 10 this month I will be giving away a free bag of Remy Ribbons with each dog treat order at Aunt Sasha's Barked Goods! Give the gift of love to your best friend this holiday season with all-natural doggie treats. My dogs give them 2 paws up!


Tuesday, December 13, 2011

Pinterest Project: Crayon Art


I found another fun project idea on pinterest, crayon art! It looked like a simple enough project, attach crayons to canvas and melt with a hair dryer or put crayons through a glue gun and melt. Above you can see the first method which my sister created this weekend (The top photo she placed pieces of crayon on the canvas which was laid flat and the hair dryer was held above the canvas and the second the canvas was upright to allow the crayon to melt downward). I decided to use the glue gun approach (I only splattered a little across my face, ouch!)


First I went online and googled silhouette stickers. I found a few I liked and printed them out. I then cut them out and traced them onto my canvas. I then filled in the picture with a black fabric marker.


Next, I covered my drawing with cardboard and painters tape.


I set my up my project in a cardboard box and used a blank canvas to test out how the melted crayon was going to flow.


The melted crayon came out in splatters, drips and runs, there really was not much consistency to it. I had to use a pencil behind each crayon to help push the crayon through. As you can see in the picture the process got a little messy (thank goodness it mostly stayed contained in the cardboard box)


Here is my final result!


Pin It

Wednesday, November 30, 2011

Baby its cold outside: what to do with a 7/8 month old

With the winter months upon us several mommies I know with babies in the 7/8 month range are wondering what to do when its too cold to play outside, and with all of the winter germs taking the tots to play groups doesn't seem like the best option.


Here are some ideas to keep the little ones busy and entertained as well as intellectually stimulated:


Crafts: While most crafts are difficult with the 7/8 month age group (since they want to put everything in their mouths) salt dough ornaments are easy to make and with all natural simple ingredients it isn't a big deal if they put it in their mouth.


Art: As I mentioned above babies put everything in their mouths, so traditional finger painting is out. However finger painting with baby food purees is in! If you don't mind getting a little messy, let them finger paint on their high chair table with puree!


Peek-a-Boo: At this age babies are learning about object permanence. (Have you noticed your baby repeatedly dropping things and waiting for you to pick them up? They are starting to learn that things don't disappear when they are out of sight.) Take a small toy and put it where your baby can see it. Then cover it with a towel. Then pick up the towel to reveal the toy again!


Developmental Toys: The ring stacking toy and stacking cups are great toys for the 7/8 months old. My son hasn't yet figured out the stacking cups, but he does enjoy knocking them down after I build a tower with them.


A few other things to try:


Dance Parties: (play your favorite tunes and let them dance around) OK so our 7/8 month old children aren't dancing around the room yet, but they will enjoy bopping along.


Flash Cards: (with colors, numbers and letters) our little ones are like sponges soaking up all of the information around them and while they won't be singing their ABC's anytime soon it never hurts to start familiarizing them with it.


Story Time: Reading to children at a young age helps develop good readers in the future. Right now my son is really into the touch and feel books.


What do you do with your baby? Any great craft ideas or art projects? Let me know!


Pin It

Thursday, November 17, 2011

New Feature


I had a few people ask how they could subscribe to my blog. So I added a new email subscription feature to the top right side of the blog. If you subscribe you will get an email at the end of the day with any new posts. If I don't post then no email will be sent. Easy Peasy!

Wednesday, November 16, 2011

Salt Dough Ornaments

I saw this on pinterest and had to give it a try (adding some new twists to make it my own). It looked like an easy project I could involve my seven month old in. Turns out it is a very easy craft project that kids of all ages will enjoy being a part of.

Step one: Gather your ingredients
2 cups flour
1/2 cup salt
3/4 cup water
food coloring (optional)
peppermint extract (optional)

Step two: Mix everything together (I started with the paddle attachment on my kitchen aid and then switched over to the dough hook and let it mix while I set up the rolling pin, cookie cutters etc.) The dough should not stick to your hands.
Step three: Roll the dough, cut it into any shape/size you like and put at least one hole in it to prevent the dough from bubbling


Step four: Add a foot or hand print

Step five: Bake at 350 for 20-30 minutes, then if you can dehydrate overnight (if you don't have a dehydrator reduce the oven temp to 150 and leave in for a few hours) as the dough cools it will harden.


Step six: Decorate! Add some ribbon or paint on a message.


Notes: I added peppermint extract to try to make the ornament smell like the holidays. The dough smelled nice before it was put in the oven but the finished product doesn't smell. Next time I might try to add an essential oil instead. Also be sure to press hands/feet/paws deep into the dough or it will be hard to see after it is baked.

Pin It

Friday, November 11, 2011

Meal Planning


At my son's six month check up his pedi told us he can now eat what we eat. She said it is really important for us all to sit down to meals together to establish good eating habits for our son. Well, I am not a three meals a day kind of girl. I eat small meals through out the day, an egg white omelet here, Greek yogurt and fruit there and by the time I get home I don't really want to sit down to a typical dinner (usually at that point I want dessert).

In order to start my son off on the right path I knew I would need to make a change, and with only 30 minutes after we get home to prepare dinner to keep our night time schedule on track I knew I would need to do some planning.


I started by making a chart of what foods I had introduced to my son and have figured out he is not allergic to them. It serves as an easy reference point to be sure I offer him a nice variety during the week.

Then I plot out the week writing new foods in red so they stand out in case we end up with any allergic reactions. I use this form. I also plan out the meals for my hubby and I (with only 30 minutes to make them it helps to look at the plan and put anything that needs to defrost in the fridge the night before.) Some examples from this week for my husband and I include taco soup, pecan crusted tilapia with roasted Parmesan potato, and Skinny Chicken Parm. (I'll post the recipes below) Some examples for my son include carrots and rice, pumpkin with greek yogurt and apple and oatmeal (before we know it he'll be eating chicken parm right along with us).


For baby food prep I steam or roast his fruits/veggies and then blend them, depending on the size of the batch using either a blender (I am super lucky to have gotten a vitamix as a gift) an immersion blender or the magic bullet (I really want the baby bullet but can't justify it since I have the other equipment). Then the purees get popped in ice cube trays (either handy ones with lids pictured below) or a regular ice cube tray wrapped with saran wrap (do not use foil it sticks to the food). As you can see below the cubes are easy to store (though they are starting to get some frost in the Tupperware, I may need to rethink that) and I just put the next day's cubes in the fridge at night and they are ready to go for the day!


Recipes: I am the type of cook who just throws in a little of this and a little of that so forgive me if I am not specific on measurements


Taco Soup:
Chicken Breast, Corn, Black Beans, Tomato, Chicken Stock and Taco Seasoning
Put it all in a crock pot and let it cook all day. The chicken will fall apart when it is done.


Pecan Crusted Tilapia and Parmesan Roasted Potato:
Pecans
Tilapia
Potatoes
Parmesan Cheese
Olive Oil
Other Spices

Simply roll the Tilapia in finely ground Pecans and any other spices you may want to add (rosemary is always nice with pecans) Thinly slice the potato and place it in a bag with a little olive oil some Parmesan cheese and any other spices you want to add. Place both on baking sheets and bake it all for 25 minutes at 350. (Don't forget to use cooking spray under the potatoes or they may stick because of the cheese)


Skinny Chicken Parm:
Chicken Breast
Quinoa Flakes
Tomato Sauce
Parmesan Cheese (optional)

Roll the chicken breasts in the quinoa flakes and give them a quick searing in a frying pan that has been sprayed with cooking spray. Then place them in a pan with Tomato Sauce on the bottom and add a little more on top of the chicken. Sprinkle with Parmesan cheese and bake for 20 minutes at 350. I served mine on top of brown rice pasta.

Drunk Gummies

This post and instructions on how to make drunk gummies has been moved to my new blog. Check out the post IsoBreathing.com


Thursday, November 10, 2011

A New Journey

Artwork for the nursery painted by Josh Miller

So much has happened since my last post. I became a mommy! The last six months have been a whirl wind of sleepless nights, diaper changes, and bottle washing. My organizing and time management skills have been put to the test. Now that we are finally sleeping through the night I thought I might resurrect the Mrs. Alexandria blog to share lessons learned, things that work well and those that don't as I navigate through this new foreign land.

Lesson 1: If you have a newborn baby boy invest in some wash cloths. I figured this one out after a midnight diaper changing where I ended up with pee in my hair. The washcloth is the perfect shield for the mid-change pee stream.

Stay tuned to see how my meal planning for the week works out, or if our salt dough Christmas ornament project ends up burning down our house.

Friday, February 25, 2011

Check out my New Blog!


One day soon I will compete in another Mrs. Pageant. Until then I am focusing my time on my Dog Treat Company, "Aunt Sasha's Barked Goods" and helping save the world one pet adoption at a time.


Please follow my puppy saving adventure on the Barked Goods Blog!!