There was a time when my house was run by a 3ft tall dictator. OK, who am I kidding, 50% of the time my house is still run by a 3ft tall dictator.
Yes, my 2.5 year old had taken over and I as the parent needed to take charge. In the morning getting ready for school and in the evening getting ready for bed had become a power struggle. We had no structure and we simply wanted to get our son off to school with clothes on in the morning (no shoes and Thomas the Train underwear outside of his clothes counts, right?)
I looked toward my inner kindergarten teacher and decided we needed to create a routine and I needed a visual aide that was interactive so he could feel involved. I turned to the bible for all things crafty, Pinterest, and started to create a plan.
Most days feel like a Momtastrophe! It is the Momtastic moments, fun community & cute accessories that keep us going!
Showing posts with label pinterest. Show all posts
Showing posts with label pinterest. Show all posts
Friday, November 1, 2013
Monday, January 16, 2012
Shoe Redo
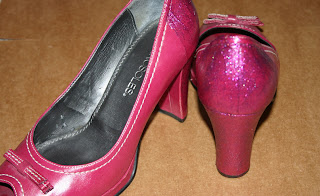
I have this super comfy pair of aerosoles that I haven't worn in a long time because the heels look like my dogs used them as a chew toy.
I saw a great idea on pinterest where someone covered their scuffed up heel in glue and then rolled it in glitter to cover the scuffs. While I was walking through Michael's Craft Store I saw Tulip Fabric Paint in a color close to my shoes! I used painters tape to keep my lines clean.
I painted on three coats allowing an hour drying time between each coat. The photo above shows one coat of paint (notice the scuff marks and tears have already disappeared!)
The final result! They are not perfect when you look up close, but they look pretty fab on my feet!
Tuesday, December 13, 2011
Pinterest Project: Crayon Art

I found another fun project idea on pinterest, crayon art! It looked like a simple enough project, attach crayons to canvas and melt with a hair dryer or put crayons through a glue gun and melt. Above you can see the first method which my sister created this weekend (The top photo she placed pieces of crayon on the canvas which was laid flat and the hair dryer was held above the canvas and the second the canvas was upright to allow the crayon to melt downward). I decided to use the glue gun approach (I only splattered a little across my face, ouch!)
 First I went online and googled silhouette stickers. I found a few I liked and printed them out. I then cut them out and traced them onto my canvas. I then filled in the picture with a black fabric marker.
 Next, I covered my drawing with cardboard and painters tape.
 I set my up my project in a cardboard box and used a blank canvas to test out how the melted crayon was going to flow.
 The melted crayon came out in splatters, drips and runs, there really was not much consistency to it. I had to use a pencil behind each crayon to help push the crayon through. As you can see in the picture the process got a little messy (thank goodness it mostly stayed contained in the cardboard box)
 First I went online and googled silhouette stickers. I found a few I liked and printed them out. I then cut them out and traced them onto my canvas. I then filled in the picture with a black fabric marker.
 Next, I covered my drawing with cardboard and painters tape.
 I set my up my project in a cardboard box and used a blank canvas to test out how the melted crayon was going to flow.
 The melted crayon came out in splatters, drips and runs, there really was not much consistency to it. I had to use a pencil behind each crayon to help push the crayon through. As you can see in the picture the process got a little messy (thank goodness it mostly stayed contained in the cardboard box)
Pin It
Subscribe to:
Posts (Atom)


