
Guest Blogger Cassie Sperling:
So, you have this really cool DSLR camera, but you don't know how to use it outside of the auto mode. You find yourself playing around with it, but then realize, you can't take a photo in the dark. "I paid all this money for a nice camera and it won't take a picture in the dark..." That was me not too long ago. I purchased my first DSLR in 2008 and have taught myself, without any courses, how to take better photos.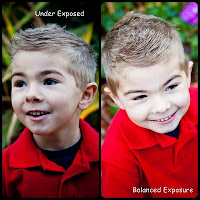
So, you have this really cool DSLR camera, but you don't know how to use it outside of the auto mode. You find yourself playing around with it, but then realize, you can't take a photo in the dark. "I paid all this money for a nice camera and it won't take a picture in the dark..." That was me not too long ago. I purchased my first DSLR in 2008 and have taught myself, without any courses, how to take better photos.
Exposure is your best friend in the photography world. Literally, just like your best friend, you find the exposure is sometimes way too bright for your liking, or too dark. Like your friendships, there needs to be a balance. Looking through your viewfinder (through the eye piece), you will see a meter on the bottom that lights up. Your goal here is to place the bar in the center of the meter to capture the best exposed photo. You can get creative with this feature if you want to purposefully over or under expose a photo.
"How do I get that bar to move?" you ask. There are a couple of ways to move that bar. ISO speed, shutter speed, and your f stop (or aperture), will help you create the perfect photo. Low light situations call for a higher ISO speed. The higher your ISO, the more light is let into your lens. Remember what I said about balance? High ISO speeds produce a lot of noise in your photos (the grainy pixels), so make adjustments with your f stop and shutter speed to create a nice balance. If you have editing software, such as Adobe Lightroom, you can reduce the noise in your photos and won't have to worry as much about a higher ISO speed. If you do not have editing software, play around with your settings, get them on the computer ASAP so you can get instant feedback and make adjustments in the future.
Your shutter speed works in the opposite direction as compared to the ISO. The higher the fraction on your shutter speed, the faster the shutter opens and closes, and the less light is allowed in through the lens. Sharp photos are produced with a faster shutter speed to reduce camera shake and to increase image stability. In combination with the ISO, your exposure is almost set.
You are in love with the photos that focus in on a subject, but are nice and blurry in the background, but how do you take that photo? (note from Mrs. Alexandria, I have always wondered this I am so excited to finally have the answer) The f stop, or aperture, determines the blur of the background, as well as how much light can be let into the lens. A low number for your f stop, such as 4.0, allows the lens to bring in more light to the camera. I always start out setting up the f stop to produce the image I am trying to capture, then I adjust the ISO speed and shutter speed.
Now that you are balanced, what are we missing? Our subject! The most important aspect of your photo. Kids are the perfect subject to test out your photography skills. With their fast action, they keep you on your toes, and will keep you adjusting your settings on your DSLR.

I have found, if you want a child to cooperate with you to get the perfect shot, start out by getting down on their level. Less intimidation is key...well, that and bribes too. Play with the angles as you capture your images; at the same time, interact with the kid. Sometimes it is hard to forget they are just sitting there building up large amounts of energy. Try some photos from up high, down low, to the side, from behind, or even straight on. Practice will make you a better photographer and it will also help you develop your own style. Remember, the more photos you take, the more you can learn about your camera, its settings, and your own style. Go grab your DSLR and start playing!
Be sure to follow Cassie on Facebook or send her an email if you have any questions studiononephotography@gmail.com
1 comment:
Good information from Cassie!
Post a Comment